
If the Web 2.0 revolution has one buzzword, it's Asynchronous JavaScript and XML (Ajax). The client-side interactivity in applications such as Google Maps™ mapping service and Gmail™ webmail service make Ajax both exciting and useful. The technologies of Ajax, including Hypertext Markup Language (HTML), JavaScript coding, Cascading Style Sheets (CSS), XML, and asynchronous Web requests, can create far more compelling Web interactions than those we saw in Web V1.0. Of course, these technologies have been around since Microsoft® Internet Explorer® V4, but only recently have other high-profile applications displayed the benefits.
How difficult is Ajax to implement? Each element of the Ajax model is relatively easy to learn. But the trick is blending all the elements into a seamless experience. Often that problem is compounded, because different individuals do the client-side and server-side coding. This article shows how just one person can write a small Ajax-based slide viewing application in a couple of hours.
Personal image-management applications such as Apple® iPhoto® on the Macintosh® have popularized the slide show view. In a slide show, the images appear in a timed sequence, with images fading in and out. In addition, the images are moved and zoomed in what has become known as the "Ken Burns Effect."
In this example, I have the browser download a list of images from the server. Then, I use that list of images to compose a slide show using Dynamic HTML (DHTML). I animate the images with random slow moves, zooms, and fades to give a pleasing version of the Ken Burns Effect without having to download Macromedia® Flash or any other heavyweight animation tools.
|
To understand what's different about Ajax, you must first understand the current model of Web programming. The simple interaction between client and server is shown in Figure 1.
Figure 1. The Web V1.0 model of client-server interaction

The Web browser, or client, makes a GET or POST request of the Web server. The server formats an HTML response.
The client parses the HTML and displays it to the user. If the user clicks another link or button,
another request is made to the server, and the current page is replaced with the new page that
the server returns.
The new model is more asynchronous, as shown in Figure 2.
Figure 2. The Ajax model of client-server interaction
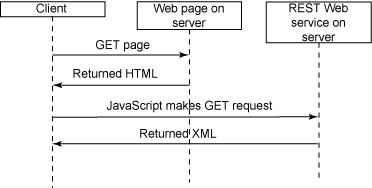
In this new model, the server returns an HTML page, just as before. But now this page has
some JavaScript code on it. That code calls back to the server for more information as needed.
Those requests can be made as simple GET requests for
Representational State Transfer (REST) service, or as the POST requests required for SOAP.
The JavaScript code then parses the response, often encoded as XML, and updates the HTML on the page dynamically to reflect the new data. In addition to XML, engineers are returning data encoded in the JavaScript Serialized Object Notation (JSON) format. This data is easier for a browser to understand but not for other client types. The value of returning XML is that clients other than browsers can interpret the data. The choice is up to you and depends on the application.
|
The first step in developing the Ajax slide show is to put together the REST data service. In this example, I use a PHP page that returns all the available slide show images and their sizes (width and height). All the images reside in a directory named images. The names of the files are name_width_height.jpg -- for example, oso1_768_700.jpg, which means that the file is a picture of Oso, one of my dogs, and is 768 pixels in width and 700 pixels in height. I use this kind of naming all the time, because it makes it easy to see what the width and height of an image are without cracking open Adobe® PhotoShop® or Macromedia Fireworks.
To serve up the list, I use the PHP server code shown in Listing 1.
Listing 1. The slides.php server page
<?php
header( "Content-type: text/xml" );
?>
<slides>
<?php
if ($handle = opendir('images')) {

while (false !== ($file = readdir($handle)))
{
        if ( preg_match( "/[.]jpg$/", $file ) ) {
                preg_match( "/_(d+)_(d+)[.]/", $file, $found );
?>
<slide src="images/<?php echo $file; ?>"
  width="<?php echo $found[1]; ?>"
  height="<?php echo $found[2]; ?>" /><?php echo( "n" ); ?>
<?php
        }
}
closedir($handle);
}
?>
</slides>
|
The code is relatively simple. To start, it sets the content type to XML. It's critical
to get the browser to recognize the document as XML and to create a document object
model (DOM) for it. The code starts the <slides> tag,
and then reads the images directory to create a <slide> tag for each image it sees. Finally, the script closes the <slides> tag.
If you navigate the Mozilla® Firefox® browser to the page, hosted (in my case) on my localhost in a directory called kenburns, you see the result shown in Figure 3.
Figure 3. The output of the slides.php server script
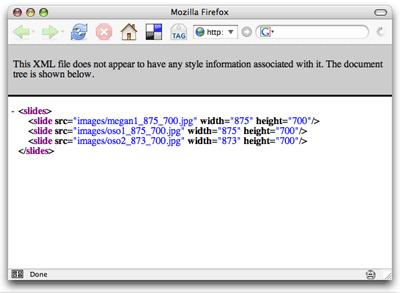
There are three images: one of my daughter and two of my dogs. Obviously, you can add whatever detail and multimedia you want here, but I've tried to keep it simple for this example.
|
The next step is to write an HTML page (shown in Listing 2) that will read the data from the service and verify that the Ajax connection between the browser and the server works. This HTML code, with embedded JavaScript code, retrieves the XML and brings up an alert shown in the text that the server returns.
Listing 2. A simple Ajax fetch page
<html>
<body>
<script>
function processReqChange()
{
 if (req.readyState == 4 && req.status == 200 && req.responseXML != null)
  {
    alert( req.responseText );
  }
}

function loadXMLDoc( url )
{
  req = false;
  if(window.XMLHttpRequest) {
    try {
      req = new XMLHttpRequest();
        } catch(e) {
      req = false;
        }
  }
  else if(window.ActiveXObject)
  {
    try {
      req = new ActiveXObject("Msxml2.XMLHTTP");
    } catch(e) {
    try {
      req = new ActiveXObject("Microsoft.XMLHTTP");
    } catch(e) {
      req = false;
    }
  }
  }
  if(req) {
    req.onreadystatechange = processReqChange;
    req.open("GET", url, true);
    req.send("");
  }
}

loadXMLDoc( "http://localhost/kenburns/slides.php" );
</script>

</body>
</html>
|
The code grabs the XML content
from a specified URL, then the loadXMLDoc function starts the
Ajax request. That request goes off asynchronously to retrieve the page and return the result.
When the request is complete, the processReqChange function
is called with the result. In this case, the processReqChange function displays the value of the responseText function in an
alert window. The result of firing up this page in my Firefox browser is shown in Figure 4.
Figure 4. The XML shown in an alert window
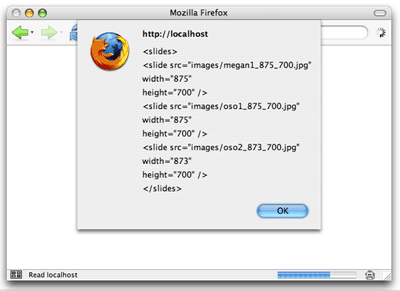
That's a good start. I'm definitely getting the XML data back from the server. But let me point out a few things. First, notice that the URL is an absolute path, domain name and all. That's the only valid URL style for Ajax. The server code that writes the Ajax JavaScript code always creates valid, fully formed URLs.
Another thing that isn't evident here is the Ajax security precautions. The JavaScript code can't ask for just any URL. The URL must have the same domain name as the page. In this case, that's localhost. But it's important to note that you can't render HTML from www.mycompany.com, and then have the script retrieve data from data.mycompany.com. Both domains must match exactly, including the sub-domains.
Another item of interest is the code in loadXMLDoc, which seems
to do back flips to create a request object. Why so much hassle? Pre-version 7 Internet Explorer
doesn't have the XMLHTTPRequest object type built in. So, I must use
Microsoft ActiveX® controls.
Finally, in the processReqChange function, you see that I look
for readyState to be equal to 4 and status to be set to 200. The readyState value of 4 means
that the transaction is complete. The status value of 200 means that the page is valid. You might also get error message 404 if a page isn't found,
just like you see in the browser. I don't handle exception cases here, because it's just example code,
but the Ajax code you ship should handle requests that return errors.
|
Before I show you how to create the slide show, I will extend the current
example by having the processReqChange function create an HTML
table with the results of the XML request from the server. In that way, I can test two things: that I
can read the XML and that I can create HTML from it dynamically.
Listing 3 shows the updated code that creates a table from the returned XML.
Listing 3. The enhanced test page
<html>
<body>
<table>
<tbody id="dataTable">
</tbody>
</table>

<script>
function processReqChange()
{
 if (req.readyState == 4 && req.status == 200 && req.responseXML != null)
 {
   var dto = document.getElementById( 'dataTable' );

    var items = [];
    var nl = req.responseXML.getElementsByTagName( 'slide' );
    for( var i = 0; i < nl.length; i++ )
    {
      var nli = nl.item( i );
      var src = nli.getAttribute( 'src' ).toString();
      var width = parseInt( nli.getAttribute( 'width' ).toString() );
      var height = parseInt( nli.getAttribute( 'height' ).toString() );

      var trNode = document.createElement( 'tr' );

      var srcNode = document.createElement( 'td' );
      srcNode.innerHTML = src;
      trNode.appendChild( srcNode );

      var widthNode = document.createElement( 'td' );
      widthNode.innerHTML = width.toString();
      trNode.appendChild( widthNode );

      var heightNode = document.createElement( 'td' );
      heightNode.innerHTML = height.toString();
      trNode.appendChild( heightNode );

      dto.appendChild( trNode );
    }
    load_slides( items );
    start_slides();
  }
}

function loadXMLDoc( url )
{
  req = false;
  if(window.XMLHttpRequest) {
    try {
      req = new XMLHttpRequest();
    } catch(e) {
      req = false;
    }
  }
  else if(window.ActiveXObject)
  {
    try {
      req = new ActiveXObject("Msxml2.XMLHTTP");
    } catch(e) {
    try {
      req = new ActiveXObject("Microsoft.XMLHTTP");
    } catch(e) {
      req = false;
    }
  }
  }
  if(req) {
    req.onreadystatechange = processReqChange;
    req.open("GET", url, true);
    req.send("");
  }
}

loadXMLDoc( "http://localhost/kenburns/slides.php" );
</script>

</body>
</html>
|
Loading the page in the browser displays the view shown in Figure 5.
Figure 5. The updated test page
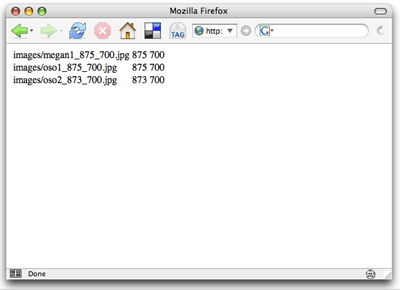
The updated processReqChange code now looks at the responseXML object instead of the responseText text. In addition, it uses getElementsByTagName to access all
the <slide> tags. From there, it parses the src, width, and height attributes and
uses the createElement method on the document object to create rows and cells to hold the data. This method of using the createElement method is far more robust than the old-school method, in which you create an HTML string with the
contents of the table and use innerHTML to add the data to an
existing element.
|
Now that I have a Web service that identifies the images in the slide show, I need the client code to display those slides and perform the Ken-Burns-Effect animations. To do that, I must put together a set of JavaScript objects that perform three basic functions:
- Encapsulate an image
- Provide a basic animation engine
- Perform the effects (for example, move, zoom, and fade)
Starting with the image container, I create a class called ImageInfo,
shown in Listing 4.
Listing 4. ImageInfo.js
function ImageInfo( src, width, height, htmlObj )
{
  this.src = src;
  this.width = width;
  this.height = height;
  this.current_width = width;
  this.current_height = height;

  this.htmlObj = htmlObj;
  this.htmlObj.src = this.src;
  this.htmlObj.width = this.current_width;
  this.htmlObj.height = this.current_height;
}

ImageInfo.prototype.set_opacity = function( opacity )
{
  this.htmlObj.style.MozOpacity = opacity / 100;
  var f = 'progid:DXImageTransform.Microsoft.Alpha(opacity='+opacity+')';
  this.htmlObj.style.filter = f;
}

ImageInfo.prototype.set_position = function( x, y )
{
  this.htmlObj.style.left = x+'px';
  this.htmlObj.style.top = y+'px';
}

ImageInfo.prototype.set_size = function( w, h )
{
  this.current_width = w;
  this.current_height = h;

  this.htmlObj.width = this.current_width;
  this.htmlObj.height = this.current_height;
}

ImageInfo.prototype.get_image = function()
{
  return this.htmlObj;
}

ImageInfo.prototype.hide = function()
{
  this.htmlObj.style.visibility = 'hidden';
}

ImageInfo.prototype.show = function()
{
  this.htmlObj.style.visibility = 'visible';
}
|
For every image in the slide show, there's one corresponding ImageInfo object. This object encapsulates the information known about the image: the src, the width, and the height. It also has a reference to the HTML <img> tag that displays the image in the document as well
as handy helper methods to move the image, set its opacity, and so on. Note that in Firefox
and other Gecko®-based browsers, the MozOpacity style is used to set the opacity. In Internet
Explorer, a filter effect is used.
Create a simple animation engine
Next, I write the simple animation engine. This code is in the Animation.js file shown in Listing 5.
Listing 5: Animation.js
function Animation( am, img, seconds, effects )
{
  this.img = img;
  this.animationManager = am;
  this.seconds = seconds;
  this.effects = effects;
  this.startMS = 0;
}

Animation.prototype.start = function()
{
  this.animationManager.add( this );
  this.startMS = 0;

  this.img.hide();
  for( var e in this.effects )
  {
    this.effects[e].apply( 0 );
  }
  this.img.show();
}

Animation.prototype.animate = function()
{
  var d = new Date();
  if ( this.startMS == 0 )
    this.startMS = d.valueOf();

  var p = (((d.valueOf()-this.startMS)/1000)/this.seconds)*100;
  for( var e in this.effects )
    this.effects[e].apply( p );
}

Animation.prototype.done = function()
{
  var d = new Date();
  return ( ( d.valueOf() - this.startMS ) / 1000 ) > this.seconds;
}

function AnimationManager( speed )
{
   this.animations = [];
   var self = this;
   window.setInterval( function() { self.idle(); }, speed );
}

AnimationManager.prototype.add = function( anim )
{
  this.animations.push( anim );
}

AnimationManager.prototype.idle = function()
{
  if ( this.animations.length > 0 )
  {
    this.animations[0].animate();
    if ( this.animations[0].done() )
      this.animations.shift();
    if ( this.animations.length == 0 )
      this.on_finished();
  }
}

AnimationManager.prototype.on_finished = function()
{
}
|
Listing 5 shows two classes: Animation and AnimationManager. The AnimationManager class controls the timer and sends animate messages out to the first item in its list of Animation objects. When the Animation object says that it's finished, the class moves on to the next item, and so on.
An Animation object applies a series of effects to a particular
image for a certain period of time specified in seconds. It's the job of the Animation object to calculate a percent complete message and
send it to the apply method of each effect. The effects then
calculate what they should do to the image based on that percentage. For example, the move
effect knows a starting point and an ending point, and it calculates where it should put the image
based on the percentage. If the percentage is 50%, the image should go half-way between
the start and the end.
As part of my work and in my research for this article, I looked at a lot of JavaScript
animation code. JavaScript animation is often criticized for being jerky, because all JavaScript
animations are performed using the window.setInterval method. This is a timer method in which you specify both the interval of the callback and the
function to call back. Most of the code on the Web is written so that every time that function
is called, the animation moves by one step. But that doesn't really work, because the interval
that you tell the browser is just a suggestion. If you say 20 milliseconds, you might
get called in 25 milliseconds one time, then a second later the next time. Browsers are single
threaded, so you can't rely on the timer.
The solution is to use the valueOf method on the Date object to see how long it has been since the start of
the animation. That difference is in milliseconds and is used to figure out what percentage
of the animation should be performed at the time the setInterval timer went off. This method provides smooth animations that actually last as long as you
specify.
The final piece of the three core classes are the Ken Burns Effects. These effects are applied
to the image through the Animation object, shown in Listing 6.
Listing 6: KenBurnsAnimations.js
function KenBurnsFader( img, windowSize )
{
  this.img = img;
  this.windowSize = windowSize;
}

KenBurnsFader.prototype.apply = function( percent )
{
  var opacity = 100;

  if ( percent <= this.windowSize )
    opacity = ( percent / this.windowSize ) * 100;
  else if ( percent >= ( 100 - this.windowSize ) )
    opacity = ( ( 100 - percent ) / this.windowSize ) * 100;

  this.img.set_opacity( opacity );
}

function KenBurnsZoomer( img, start, end, cw, ch )
{
  this.start = start;
  this.end = end;
  this.img = img;

  var wr = this.img.width / cw;
  var nw = this.img.width * wr;
  var nh = this.img.height * wr;

  this.sw = ( nw * ( this.start / 100 ) );
  this.ew = ( nw * ( this.end / 100 ) );
  this.sh = ( nh * ( this.start / 100 ) );
  this.eh = ( nh * ( this.end / 100 ) );
  this.dw = ( this.ew - this.sw ) / 100;
  this.dh = ( this.eh - this.sh ) / 100;
}

KenBurnsZoomer.prototype.apply = function( percent )
{
  this.img.set_size(
    this.sw + ( this.dw * percent ),
    this.sh + ( this.dh * percent ) );
}

function KenBurnsMover( img, sx, sy, ex, ey, cw, ch )
{
  this.img = img;
  this.sx = sx / 100;
  this.ex = ex / 100;
  this.sy = sy / 100;
  this.ey = ey / 100;
  this.cw = cw;
  this.ch = ch;
  this.wr = this.img.width / this.cw;
}

KenBurnsMover.prototype.apply = function( percent )
{
  var nw = this.img.current_width * this.wr;
  var nh = this.img.current_height * this.wr;

  var cntw = ( ( this.cw / 2 ) - ( nw / 2 ) );
  var cnth = ( ( this.ch / 2 ) - ( nh / 2 ) );

  var sx = ( nw * this.sx );
  var ex = ( nw * this.ex );
  var sy = ( nh * this.sy );
  var ey = ( nh * this.ey );
  var dx = ( ex - sx ) / 100;
  var dy = ( ey - sy ) / 100;
  var x = cntw + sx + ( dx * percent );
  var y = cntw + sy + ( dy * percent );

  this.img.set_position( x, y );
}
|
These three classes handle the different effects applied to the image. The KenBurnsFader class handles the fade-in and fade-out of the
image using opacity. The KenBurnsZoomer class handles
zooming the image from some start zoom level to an end zoom level. The KenBurnsMover class handles moving the image from a starting
point to an end point (specified in percent size of the image).
After experimenting a bit, I found that the most appealing movement effects were when
the image moved from corner to corner relative to the middle of the window. The apply method of the KenBurnsMover class contains some complicated math not only to move the image relative to the center of the
containing <div> tag but also to size the image relative to
the size of the <div> tag, so the animation appears small
in a small window and large in a large window. That magnification is based on the height of
the window.
With these foundation classes in hand, it's time to implement the non-Ajax DHTML version of the slide show for testing purposes, as shown in Listing 7.
Listing 7. The non-Ajax slide show
<html>
<head>
<style type="text/css">
body { background: black; margin: 0px; padding: 0px; }
</style>
<script src="KenBurnsAnimations.js">
</script>
<script src="Animation.js">
</script>
<script src="ImageInfo.js">
</script>
<script>
var g_animationManager = new AnimationManager( 50 );
var g_current_slide = 0;
var g_slides = [];
var g_directions = [
{ sx: [ -30, 0 ], ex: [ 5, 40 ], sy: [ -30, 0 ], ey: [ 5, 40 ] }, // nw -> se
{ sx: [ 5, 40 ], ex: [ -30, 0 ], sy: [ 5, 40 ], ey: [ -30, 0 ] }, // ne -> sw
{ sx: [ 5, 40 ], ex: [ -30, 0 ], sy: [ 5, 40 ], ey: [ -30, 0 ] }, // se -> nw
{ sx: [ -30, 0 ], ex: [ 5, 40 ], sy: [ 5, 40 ], ey: [ -30, 0 ] } // sw -> ne
];

g_animationManager.on_finished = function()
{
  g_current_slide++;
  if ( g_current_slide >= g_slides.length )
    g_current_slide = 0;
  g_slides[ g_current_slide ].start();
}

function rnd( start, end )
{
  return ( Math.random() * ( end - start ) ) + start;
}

function load_slides( images )
{
  var ic = document.getElementById( 'imgContainer' );

  for( var i in images )
  {
    var img = images[i];

    var imgObj = document.createElement( 'img' );
    imgObj.style.position = 'absolute';
    imgObj.style.left = '0px';
    imgObj.style.top = '0px';
    imgObj.style.visibility = 'hidden';
    ic.appendChild( imgObj );

    var ii = new ImageInfo( img.src, img.width, img.height, imgObj );

        var szoom = rnd( 50, 100 );
        var ezoom = rnd( 70, 120 );

        var d = parseInt( ( Math.random() * g_directions.length ).toString() );
        var di = g_directions[ d ];
        var sx = rnd( di.sx[0], di.sx[1] );
        var sy = rnd( di.sy[0], di.sy[1] );
        var ex = rnd( di.ex[0], di.ex[1] );
        var ey = rnd( di.ey[0], di.ey[1] );

    g_slides.push(
      new Animation( g_animationManager, ii, 10,
        [ new KenBurnsZoomer( ii, szoom, ezoom, ic.clientWidth, ic.clientHeight ),
          new KenBurnsMover( ii, sx, sy, ex, ey, ic.clientWidth, ic.clientHeight ),
          new KenBurnsFader( ii, 30 ) ] )
    );
  }
}

function start_slides()
{
  g_slides[ g_current_slide ].start();
}
</script>
</head>
<body>

<div style="position:relative;width:100%;height:100%;overflow:hidden;"
  id="imgContainer">
</div>

<script>
var images = [
{ src: 'images/megan1_875_700.jpg', width: 875, height: 700 },
{ src: 'images/oso1_875_700.jpg', width: 875, height: 700 },
{ src: 'images/oso2_873_700.jpg', width: 873, height: 700 }
];
load_slides( images );
start_slides();
</script>

</body>
</html>
|
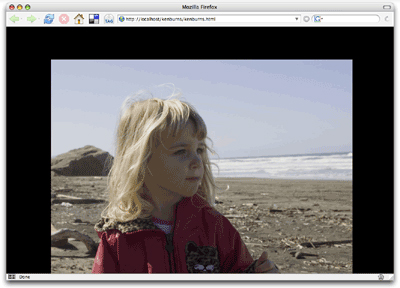
It's tough to show what this looks like in a browser without a movie. So, I took a single snapshot of the show and present it in Figure 6. (Be sure you look at the live demo of the slide show.)
Figure 6. A snapshot from the slide show
This page starts by bringing in the base classes through the src items on the <script> tags. After those classes are installed, new
functions are added to bring the whole mechanism together: load_slides and start_slides. The load_slides function takes an array of image src, width,
and height specifications, and then creates the <image> tags and the animations. The start_slides function starts the slide show with the first item.
Another function attached to the animation manager, on_finished,
is called whenever an animation is complete. I use that notification to move on to the next
slide or to return to the first slide in the list if I've completed the animation of all the slides.
Getting back to load_slides, notice that it references an array
called g_directions. This array contains a set of random ranges
that the slide loader uses to specify where the image should start and end its movement. The
most appealing effects go from corner to corner. As you can see from the comments, these
ranges specify movement of the slide from each combination of northeast, southeast, northwest,
and southwest. The last <script> tag defines an array of
images, and then uses the load_slides and start_slides functions to start the slide show.
|
The final step in this process is to create the Ajax version of the slide show. This means replacing the hard-coded image list with something retrieved from the slides.php service.
The Ajax version of the slide show code is shown in Listing 8.
Listing 8. The Ajax slide show code
<html>
<head>
<style type="text/css">
body { background: black; margin: 0px; padding: 0px; }
</style>
<script src="KenBurnsAnimations.js">
</script>
<script src="Animation.js">
</script>
<script src="ImageInfo.js">
</script>
<script src="SlideShow.js">
</script>
</head>
<body>

<div style="position:relative;width:100%;height:100%;overflow:hidden;"
  id="imgContainer">
</div>

<script>
function processReqChange()
{
  if (req.readyState == 4 && req.status == 200
      && req.responseXML != null)
  {
    var items = [];
    var nl = req.responseXML.getElementsByTagName( 'slide' );
    for( var i = 0; i < nl.length; i++ )
    {
      var nli = nl.item( i );
      var src = nli.getAttribute( 'src' ).toString();
      var width = parseInt( nli.getAttribute( 'width' ).toString() );
      var height = parseInt( nli.getAttribute( 'height' ).toString() );
      items.push( { src: src, width: width, height: height } );
    }
    load_slides( items );
    start_slides();
  }
}

function loadXMLDoc( url )
{
  req = false;
  if(window.XMLHttpRequest) {
    try {
      req = new XMLHttpRequest();
    } catch(e) {
      req = false;
    }
  }
  else if(window.ActiveXObject)
  {
    try {
      req = new ActiveXObject("Msxml2.XMLHTTP");
    } catch(e) {
    try {
      req = new ActiveXObject("Microsoft.XMLHTTP");
    } catch(e) {
      req = false;
    }
  }
  }
  if(req) {
    req.onreadystatechange = processReqChange;
    req.open("GET", url, true);
    req.send("");
  }
}

loadXMLDoc( "http://localhost/kenburns/slides.php" );
</script>

</body>
</html>
|
|
I moved the start_slides and load_slides functions into an external JavaScript file called SlidesShow.js to keep the length of this file
short. The rest of the code is similar to what I had in the Ajax test page in Listing 2.
But rather than insert an alert window or add items to a table, this code creates an
array of slide information, and then calls load_slides and start_slides.
And that's it! An Ajax slide show using the Ken Burns Effect to move, zoom, and fade images dynamically.
|
Adapting Ajax slide shows to your needs
In this article, I used object-oriented JavaScript code whenever possible. JavaScript is a fully
object-oriented language, and although it might not use the class and interface keywords, it keeps your code clean and maintainable.
I also recommend using Ajax frameworks if you can. I didn't use one here because I wanted
to show a lightweight Ajax solution. But today's frameworks -- and there are many of them --
make it easier to write more portable Ajax and DHTML code.
In addition to what you've seen in this article, I have the following recommendations for your Ajax slide shows:
- Use time-based animations. The steps-based animation that people try to use with
setIntervalcode just ends up looking jerky. - Prototype your code in DHTML for the visual elements, then add the Ajax stuff later. This means that you can work on your DHTML code off-line.
- Compartmentalize the Ajax code that connects to the server from the DHTML user interface (UI) components that render the data. That way, you can use the components even when you don't use Ajax to get the data.
- Use the
createElementandappendChildfunctions instead ofinnerHTMLfunction to adjust the contents of the page. - Be sure to check your client-side code against all the browsers you want to support. Also, keep a list of the compatibility problems you run into as well as notes on how you resolved those problems. Try to encapsulate client-side fixes into reusable JavaScript helper functions and classes.
- For complicated interfaces, including multiple animations, use a storyboard first so that you can work with your customers to figure out exactly what they need before you code it. A storyboard is the animation version of a code spec. JavaScript animations are fast to write, so it's worth having a clear sense of what you want before you start coding. Otherwise, you might end up throwing a lot away.
- From a career perspective, the "back-end engineers" of the Web V1.0 world, who focused just on the database and the business logic, are limited in the Web V2.0 world. It's time to realize that not all requests to the server are going to be looking for HTML. Also, Ajax and DHTML are real tools for real engineers who are paid real money for their skills. The front end isn't just for designers.
It used to be that you needed Flash or a similar application to make dynamic slide shows like the one in this article. With modern browsers, which include excellent support for DHTML with rich effects like opacity (or even rotation, blur, and so on, in Internet Explorer) and Ajax, you can do amazing things right in the browser. That means that your customers don't have to download fancy extensions or run potentially unsafe applications. They can just surf to your pages and get stunning graphic effects that will keep them coming back for more.